
Monday, May 7, 2012
12 X 12 - Charm Scraps
This month's scrap buster project is really quick and easy, but I think you'll love it. And it's just in time to make a last minute Mother's Day gift!

Tuesday, May 1, 2012
Cinco de Mayo Sale!!

Check out our giant sale! Right now get 30% off all fabric by the yard with coupon code "MAYO2012" and also look for special discounts on select kits and bundles!
Click here to start shopping!
Tuesday, April 24, 2012
Prairie Points
Now that we have a completed quilt top, we're ready to finish! Layer the quilt top with the batting and backing. Pin, spray or baste as you normally do, except do not include the border in the pinning/basting process. (If you have a border wider than 3 or 4 inches, you may want to quilt part of it. Just be sure to leave the outer 2 - 3 inches unquilted.) Now quilt as desired - I did a simple free-motion meander stitch. Do not quilt the border (or outer 3 inches) yet.

Then square up your quilt and trim all three layers even with the top layer.

Next, flip the quilt over and pin the unquilted part of the backing away from the edges The batting stays with the quilt top:

Set the quilt aside while we prepare the Prairie Points. Use the (80) 4" squares cut from the focus fabric and scraps to make the Points. Begin by folding a square in half, wrong sides together, diagonally; press. Fold in half diagonally again and press:

Once all the Prairie Points are pressed, begin laying them along one edge of the quilt, starting in one corner and matching the raw edges. Lay them out randomly, but keep in mind you have a lot more focus fabric points than any other so use them often.

Prairie Points overlap each other. One side of the folds is closed and one is open. The open side in my picture is the side on the left. The next point will be inserted in between the folds on the open side:

Lay 23 points along the long sides of the quilt and 17 along the short sides, spacing them evenly (you can just eyeball it!). Insert each point in between the folds of the one to its right like the picture above.
When you turn the corner, they just butt up against each other, as shown below:

Once you have one side evenly spaced and the points all properly laid out, pin each one to hold it. Now you can continue on with the remaining 3 sides or stitch the pinned side first. Stitch 1/4" from the raw edges, making sure you catch all layers except the backing fabric.
Note: if you are making a boy's quilt, the Prairie Points are often left pointing toward the center like this and a binding is added to finish the edge.
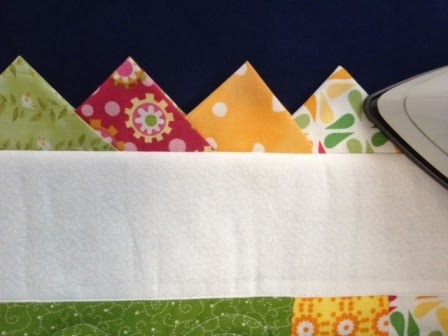
Take the quilt to your ironing board and flip the points toward the outside, turning the raw edges under as you do. Press them well all the way around:

Unpin the backing and press fabric smooth. Now we just need to turn under a quarter inch and hand-stitch the backing to the Prairie Points, covering up the seam:

You may have to use a couple of extra pins and kind of work the corners to get them square. Just keep smoothing the fabrics and making sure you're not pulling one side too tight. Once you've hand-stitched the backing in place, you can go back and quilt the border. And it's done!

Please consider posting a picture of your finished Scrappy Rails to our Facebook page!

Then square up your quilt and trim all three layers even with the top layer.

Next, flip the quilt over and pin the unquilted part of the backing away from the edges The batting stays with the quilt top:

Set the quilt aside while we prepare the Prairie Points. Use the (80) 4" squares cut from the focus fabric and scraps to make the Points. Begin by folding a square in half, wrong sides together, diagonally; press. Fold in half diagonally again and press:

Once all the Prairie Points are pressed, begin laying them along one edge of the quilt, starting in one corner and matching the raw edges. Lay them out randomly, but keep in mind you have a lot more focus fabric points than any other so use them often.

Prairie Points overlap each other. One side of the folds is closed and one is open. The open side in my picture is the side on the left. The next point will be inserted in between the folds on the open side:

Lay 23 points along the long sides of the quilt and 17 along the short sides, spacing them evenly (you can just eyeball it!). Insert each point in between the folds of the one to its right like the picture above.
When you turn the corner, they just butt up against each other, as shown below:

Once you have one side evenly spaced and the points all properly laid out, pin each one to hold it. Now you can continue on with the remaining 3 sides or stitch the pinned side first. Stitch 1/4" from the raw edges, making sure you catch all layers except the backing fabric.
Note: if you are making a boy's quilt, the Prairie Points are often left pointing toward the center like this and a binding is added to finish the edge.
Take the quilt to your ironing board and flip the points toward the outside, turning the raw edges under as you do. Press them well all the way around:
Unpin the backing and press fabric smooth. Now we just need to turn under a quarter inch and hand-stitch the backing to the Prairie Points, covering up the seam:

You may have to use a couple of extra pins and kind of work the corners to get them square. Just keep smoothing the fabrics and making sure you're not pulling one side too tight. Once you've hand-stitched the backing in place, you can go back and quilt the border. And it's done!

Please consider posting a picture of your finished Scrappy Rails to our Facebook page!
Thursday, April 5, 2012
12 X 12 - Scrappy Rails
This month's scrap buster is a kid's scrappy rail fence quilt with prairie points. (To see the other quilts in our series, start here!) This quilt is approximately 36" X 48" (or 40" X 52" including the prairie points).

This post will include instructions for completing the quilt top. The prairie points and finishing will be detailed in the next post.
Here's what you need:
1/3 - 1/2 yard of a focus fabric
1/2 yard of white or other neutral fabric
1/8 yard of a coordinating stripe
assorted scraps to coordinate with focus fabric
(see post from 3/28/12 for more on selecting fabrics for this project)
**I created a "starter kit" for a customer who wanted some of the fabrics I used. If you're interested in these colors, a kit with a total of 2-1/2 yards can be purchased here for $20. These are the fabrics:

Wednesday, March 28, 2012
12 X 12 - April's Scrappy Quilt
For our April scrappy project, I thought it would be fun to do a kid's quilt. And make (or learn to make) Prairie Points! This project leans a little toward the girlie side, but we'll discuss a slight variation that works great for a boy. Anyway, I wanted to give you a little advance notice so you would have plenty of time to plan your fabrics.
The main design/block for this quilt will be a rail fence (with only 3 rails), like this:

This is a great "skill builder" block because you need to use an accurate 1/4" seam to ensure that you end up with a 6-1/2" square (unfinished) block. After the first few blocks, you should have your 1/4" seam perfect and then just breeze through the rest of the blocks!
This quilt also has 2 sections with a little bit of applique. Each of these sections will replace 3 of the rail fence blocks, so if you're adamantly opposed to applique, you can just make more of the blocks or even substitute a larger piece of the focus fabric.
Subscribe to:
Posts (Atom)