
Before we get into the how-tos, here's a brief recap of why I changed mid-process. I originally wanted a quilt made up of pinwheels and 9-patches (alternating between each). I got all the pinwheels done and put up on the design wall, then started making the 9-patch blocks. I'm very impatient and after I had a few finished, I raced over to add them to the pinwheels so I could admire how good it was going to look. I like to put something up on the wall and then try to not look until I get way back. So I put up the blocks, walked to the other side of the room, and turned to look . . . at this:

Ugh - it was too much scrappy. (It actually looks better in the picture!) It all ran together into one big scrappy mess! So I stood there and stared at it for the longest time. Then I started rearranging blocks (I wish I had taken pictures, but I wasn't thinking that far ahead).
I tried putting 4 of one block in the middle and then a row of the others around them, followed by another ring and yuck! I tried putting them in strips, by block style and into rows by block style (I know - if it didn't work one direction, why did I think it might work the other?!!)
At some point, I noticed that I liked the way the pinwheels looked with each other. That's when I scrapped the 9-patches and put the pinwheels in blocks of 4, separated by sashing. And the Scrappy Boxed Pinwheels was born!
-----
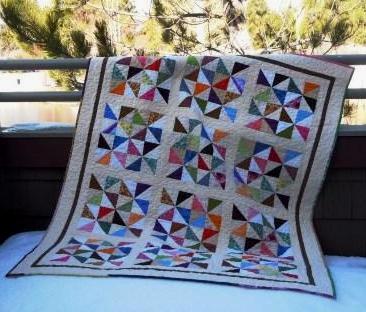
So now for the directions. The quilt I made finishes at 48" X 60". You could easily add more blocks to make it bigger.
(I added about 1-1/4 yards of solid cream Kona cotton and about 1/4 yard of a brown fabric for the borders to my stash of scraps for this project.)
From scraps, cut the following:
(96) 3-7/8" squares of various cream fabrics
(96) 3-7/8" squares of various colored squares
Match a cream fabric and a color right sides together; draw a diagonal line on the wrong side of one fabric:

Then stitch a scant 1/4" on each side of the pencil line:

Cut on the pencil line, to create 2 Half Square Triangle blocks:
Open, press toward the darker fabric and square up the blocks (to 3-1/2"). I like to use the diagonal line on my ruler - I line it up on the seam and trim two sides. Then I rotate the block and line the diagonal line up on the seam again and trim the other two sides. That method ensures that I end up with a block like the one pictured on the left (rather than the one on the right), below:

Make 192 Half Square Triangle blocks.
To make pinwheels, lay four HSTs out in a square with all the colored "blades" turning the same direction and sew together:

Make 48 Pinwheel blocks.
Square them up, using the same method of lining the diagonal line on your ruler up with the diagonal seam on the block:

Then, lay 4 Pinwheels out in a square and sew together, making (12) large 12-1/2" Pinwheel Squares.
From the Kona cream, cut (3) 2-1/2" strips; subcut these into (8) 2-1/2" X 12-1/2" sashing strips. The sashing strips go between each of the blocks, creating 4 rows:

Cut (3) 2-1/2" X 40-1/2" strips from the Kona cream. These are the horizontal sashing strips.
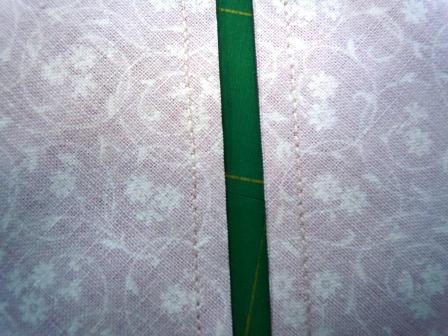
Hint: this little trick helps line up the vertical sashing strips:
Sew the sashing strip to one side of the block row; press. Then fold the sashing strip back to the right-sides-together position and make a little pencil mark where it lines up with the seams of the vertical strips:

Fold it back out flat and lay the next row down right sides together. Match the pencil marks up with seam lines on the next row: (in this picture, it kind of looks like a pencil line on the bottom fabric, but that's just the seam.)

Finish sewing all the rows together, matching the sashing strips:

From the Kona cream, cut (5) 2" strips. Measure the quilt top and add the strips around the outside forming the first border (piece strips together as needed):

Add the second border in the same manner, cutting (5) 1-1/4" strips from the brown fabric:

Cut (6) 3" strips of cream Kona for the final border:

Now it's ready to be quilted and bound. I used a bunch of leftover pieces to make a scrappy binding as you can (sort of) see in the final photo:
In other scrappy news, I'm still filling up the liner for my doggie bed. And I haven't made a lot of progress on my Hexie Diamonds. But I'm going to get back to that now! How are you doing on these?
That is absolutely STUNNING! Wow!
ReplyDeleteThanks Melissa! I used to shy away from sashing until I figured out that easy way to match the seams - now I want to sash everything. :)
DeleteLove this!!
ReplyDeleteThanks Susan!
DeleteI love love love this. Now I have another thing to add to my 'to make someday' list.
ReplyDeleteHahaha! Will we ever get through those lists Deb?
DeleteLove this scrappy pinwheel. Very nice! :)
ReplyDeleteThanks Tara!
DeleteLooks beautiful and it is so nice to have space for your eyes to rest!
ReplyDeleteThanks Connie - now that you say that, I see what you mean!
Delete