I love making pot holders from scraps. It doesn't take much fabric and they make such wonderful gifts. We're coming into that time of year when we're always thinking, "what should I get for a hostess gift or co-worker, neighbor, hair stylist, teacher, dog groomer :) ", the list goes on and on!
Here's a fun way to make a great set of matching pot holders. For this tutorial, I'm using a super basic sketch of a pear, but I also like to make these by tracing around a cute cookie cutter. Then I can give them as a gift with the matching cookie cutter.
Showing posts with label 12 X 12. Show all posts
Thursday, November 1, 2012
Thursday, August 30, 2012
Scrappy Fall Wall Hanging
Yikes! The end of the month again, and we are just finally getting our next Scrappy Quilt-A-Long Project up! Well, the good news is this project comes together super fast -- in just a few hours, as a matter of fact :)
This simple wall hanging is a perfect example of using a few
bold, modern fabrics to make something seemingly traditional – like subtle
cream-on-cream prints – look so fresh and fun. The bright leaves seem to dance across a brick
wall, blowing in a crisp fall breeze. What
a great way to use up a few miscellaneous scraps that just don’t seem to fit
with anything else!
Finished size: 28 ½” x 18 ½”
What You’ll Need:
- Assortment of creams and off-whites
- 6-8 different bold, bright scraps (florals, geometrics, etc.) - depending on how many leaves you want
- Fusible appliqué paper
- Brown fabric for backing and binding (or piece various dark scraps together to create a one-of-a-kind backing or binding)
Labels:
12 X 12,
tutorials,
video tutorials
Tuesday, July 31, 2012
A Scrap Quickie!
I'm little embarrassed to admit that I've never made a disappearing 9-patch quilt before. To be honest, the block never really appealed much to me. But I made a small D9P for our July scrap-busting project and I have to say, it was a fun, fun quilt to make! I'm now a big fan of this block.
This 39-1/2" X 39-1/2" kid sized quilt was super fast to put together. You could make it this size for a quick shower gift or a great table topper, or add more blocks and make a lap or bed quilt. The blocks finish at 13" and we used only 9 blocks for this one.
Labels:
12 X 12,
Quilt Along,
Stash busting,
tutorials
Friday, June 29, 2012
Not so much "scrappy", but . . .
I've really fallen behind on my scrap busting commitment. As June comes to an end, I haven't even started this month's project. In fact, I haven't done any quilting this month except for one project. Even though it's not a true scrap buster, I think there may still be a couple of people who are interested in this. So I'd like to share what I did.
Monday, May 7, 2012
12 X 12 - Charm Scraps
This month's scrap buster project is really quick and easy, but I think you'll love it. And it's just in time to make a last minute Mother's Day gift!
Tuesday, April 24, 2012
Prairie Points
Now that we have a completed quilt top, we're ready to finish! Layer the quilt top with the batting and backing. Pin, spray or baste as you normally do, except do not include the border in the pinning/basting process. (If you have a border wider than 3 or 4 inches, you may want to quilt part of it. Just be sure to leave the outer 2 - 3 inches unquilted.) Now quilt as desired - I did a simple free-motion meander stitch. Do not quilt the border (or outer 3 inches) yet.
Then square up your quilt and trim all three layers even with the top layer.
Next, flip the quilt over and pin the unquilted part of the backing away from the edges The batting stays with the quilt top:
Set the quilt aside while we prepare the Prairie Points. Use the (80) 4" squares cut from the focus fabric and scraps to make the Points. Begin by folding a square in half, wrong sides together, diagonally; press. Fold in half diagonally again and press:
Once all the Prairie Points are pressed, begin laying them along one edge of the quilt, starting in one corner and matching the raw edges. Lay them out randomly, but keep in mind you have a lot more focus fabric points than any other so use them often.
Prairie Points overlap each other. One side of the folds is closed and one is open. The open side in my picture is the side on the left. The next point will be inserted in between the folds on the open side:
Lay 23 points along the long sides of the quilt and 17 along the short sides, spacing them evenly (you can just eyeball it!). Insert each point in between the folds of the one to its right like the picture above.
When you turn the corner, they just butt up against each other, as shown below:
Once you have one side evenly spaced and the points all properly laid out, pin each one to hold it. Now you can continue on with the remaining 3 sides or stitch the pinned side first. Stitch 1/4" from the raw edges, making sure you catch all layers except the backing fabric.
Note: if you are making a boy's quilt, the Prairie Points are often left pointing toward the center like this and a binding is added to finish the edge.
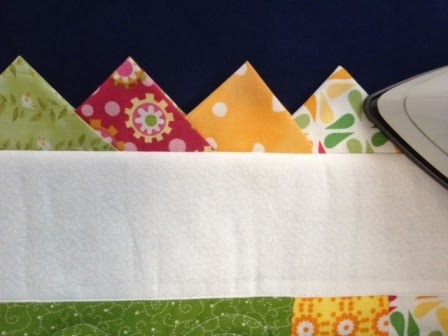
Take the quilt to your ironing board and flip the points toward the outside, turning the raw edges under as you do. Press them well all the way around:
Unpin the backing and press fabric smooth. Now we just need to turn under a quarter inch and hand-stitch the backing to the Prairie Points, covering up the seam:
You may have to use a couple of extra pins and kind of work the corners to get them square. Just keep smoothing the fabrics and making sure you're not pulling one side too tight. Once you've hand-stitched the backing in place, you can go back and quilt the border. And it's done!
Please consider posting a picture of your finished Scrappy Rails to our Facebook page!
Then square up your quilt and trim all three layers even with the top layer.
Next, flip the quilt over and pin the unquilted part of the backing away from the edges The batting stays with the quilt top:
Set the quilt aside while we prepare the Prairie Points. Use the (80) 4" squares cut from the focus fabric and scraps to make the Points. Begin by folding a square in half, wrong sides together, diagonally; press. Fold in half diagonally again and press:
Once all the Prairie Points are pressed, begin laying them along one edge of the quilt, starting in one corner and matching the raw edges. Lay them out randomly, but keep in mind you have a lot more focus fabric points than any other so use them often.
Prairie Points overlap each other. One side of the folds is closed and one is open. The open side in my picture is the side on the left. The next point will be inserted in between the folds on the open side:
Lay 23 points along the long sides of the quilt and 17 along the short sides, spacing them evenly (you can just eyeball it!). Insert each point in between the folds of the one to its right like the picture above.
When you turn the corner, they just butt up against each other, as shown below:
Once you have one side evenly spaced and the points all properly laid out, pin each one to hold it. Now you can continue on with the remaining 3 sides or stitch the pinned side first. Stitch 1/4" from the raw edges, making sure you catch all layers except the backing fabric.
Note: if you are making a boy's quilt, the Prairie Points are often left pointing toward the center like this and a binding is added to finish the edge.
Take the quilt to your ironing board and flip the points toward the outside, turning the raw edges under as you do. Press them well all the way around:
Unpin the backing and press fabric smooth. Now we just need to turn under a quarter inch and hand-stitch the backing to the Prairie Points, covering up the seam:
You may have to use a couple of extra pins and kind of work the corners to get them square. Just keep smoothing the fabrics and making sure you're not pulling one side too tight. Once you've hand-stitched the backing in place, you can go back and quilt the border. And it's done!
Please consider posting a picture of your finished Scrappy Rails to our Facebook page!
Thursday, April 5, 2012
12 X 12 - Scrappy Rails
This month's scrap buster is a kid's scrappy rail fence quilt with prairie points. (To see the other quilts in our series, start here!) This quilt is approximately 36" X 48" (or 40" X 52" including the prairie points).
This post will include instructions for completing the quilt top. The prairie points and finishing will be detailed in the next post.
Here's what you need:
1/3 - 1/2 yard of a focus fabric
1/2 yard of white or other neutral fabric
1/8 yard of a coordinating stripe
assorted scraps to coordinate with focus fabric
(see post from 3/28/12 for more on selecting fabrics for this project)
**I created a "starter kit" for a customer who wanted some of the fabrics I used. If you're interested in these colors, a kit with a total of 2-1/2 yards can be purchased here for $20. These are the fabrics:
This post will include instructions for completing the quilt top. The prairie points and finishing will be detailed in the next post.
Here's what you need:
1/3 - 1/2 yard of a focus fabric
1/2 yard of white or other neutral fabric
1/8 yard of a coordinating stripe
assorted scraps to coordinate with focus fabric
(see post from 3/28/12 for more on selecting fabrics for this project)
**I created a "starter kit" for a customer who wanted some of the fabrics I used. If you're interested in these colors, a kit with a total of 2-1/2 yards can be purchased here for $20. These are the fabrics:
Labels:
12 X 12,
Quilt Along
Wednesday, March 28, 2012
12 X 12 - April's Scrappy Quilt
For our April scrappy project, I thought it would be fun to do a kid's quilt. And make (or learn to make) Prairie Points! This project leans a little toward the girlie side, but we'll discuss a slight variation that works great for a boy. Anyway, I wanted to give you a little advance notice so you would have plenty of time to plan your fabrics.
The main design/block for this quilt will be a rail fence (with only 3 rails), like this:
This is a great "skill builder" block because you need to use an accurate 1/4" seam to ensure that you end up with a 6-1/2" square (unfinished) block. After the first few blocks, you should have your 1/4" seam perfect and then just breeze through the rest of the blocks!
This quilt also has 2 sections with a little bit of applique. Each of these sections will replace 3 of the rail fence blocks, so if you're adamantly opposed to applique, you can just make more of the blocks or even substitute a larger piece of the focus fabric.
The main design/block for this quilt will be a rail fence (with only 3 rails), like this:
This is a great "skill builder" block because you need to use an accurate 1/4" seam to ensure that you end up with a 6-1/2" square (unfinished) block. After the first few blocks, you should have your 1/4" seam perfect and then just breeze through the rest of the blocks!
This quilt also has 2 sections with a little bit of applique. Each of these sections will replace 3 of the rail fence blocks, so if you're adamantly opposed to applique, you can just make more of the blocks or even substitute a larger piece of the focus fabric.
Labels:
12 X 12,
Quilt Along
Monday, March 19, 2012
12 X 12 - Scrappy Pet Bed
I started this scrappy project as a way to use little "garbage" scraps. Pieces that are too small to use - like the skinny strips you trim off a block to square it up; or a big pile of thread scraps. For more about this project or any of our 12 scrappy projects in 2012, click here.
The how-to for the liner can be found here. Once the liner is full, you'll need a nice scrappy, quilted cover for it.
Tuesday, March 6, 2012
12 X 12 - Boxed Pinwheels
Our scrappy quilt for March started out a little different than it ended up. However, I'm pretty happy with the result: (For the background story on our scrappy quilt along, click here.)
Before we get into the how-tos, here's a brief recap of why I changed mid-process. I originally wanted a quilt made up of pinwheels and 9-patches (alternating between each). I got all the pinwheels done and put up on the design wall, then started making the 9-patch blocks. I'm very impatient and after I had a few finished, I raced over to add them to the pinwheels so I could admire how good it was going to look. I like to put something up on the wall and then try to not look until I get way back. So I put up the blocks, walked to the other side of the room, and turned to look . . . at this:
Labels:
12 X 12,
Quilt Along
Friday, February 17, 2012
12 X 12 Scrappy Hexagon Quilt
This is another scrap busting quilt in our 12 scrappy projects in 12 months (12 X 12) series. For a little more information, click here.
There are so many options when it comes to English Paper Piecing - hexagons, diamonds, blocks, tumblers and more. Several websites have free downloads for paper piecing templates and there are online stores that sell precut shapes. A quick search on google will help you find both.
I think this is a great hand sewing project if you're not in a big hurry to finish it. I'll be working on mine over the course of months (maybe longer!!). I've chosen 7/8" hexies that I'll put together in a diamond shape, like this:
There are so many options when it comes to English Paper Piecing - hexagons, diamonds, blocks, tumblers and more. Several websites have free downloads for paper piecing templates and there are online stores that sell precut shapes. A quick search on google will help you find both.
I think this is a great hand sewing project if you're not in a big hurry to finish it. I'll be working on mine over the course of months (maybe longer!!). I've chosen 7/8" hexies that I'll put together in a diamond shape, like this:
Labels:
12 X 12
Saturday, February 4, 2012
12 X 12 - Super Scrappy Pet Bed
Here is the second of our 12 scrappy projects for 2012 - or "12 X 12". To start at the beginning, click here.
This scrap busting project has a great bonus! We'll be using "garbage scraps" that would otherwise go in the trash and landfills, to fill our pet beds. Yay us!
Friday, January 20, 2012
A Scrappy Finish
I'm sitting here all snuggled up under a freshly washed scrappy quilt typing up this post. I really wasn't that crazy about it as I was finishing the quilting part, but it is kind of growing on me.
Labels:
12 X 12,
Quilt Along
Sunday, January 15, 2012
12 X 12 Backing Ideas
I finally finished the quilt top for our first scrap busting project! Are you with me - or getting close?
As I was mindlessly sewing these pieces together, I was thinking about backing. Here are some of my thoughts on backing:
Labels:
12 X 12,
Quilt Along
Thursday, January 12, 2012
12 X 12 Small Scrappy Rectangles
Oops! I forgot to post the construction details for the smaller versions of this quilt. If you are making this quilt in the smallest size - 39-1/2" X 48", you need to make 7 rows of 9 larger rectangles alternating with 8 skinny rectangles. (refer to the 1/11/12 post for more details, if needed) Then you'll fill in between those rows with the little 1-1/2" pieces - make 6 of those rows.
For the medium sized quilt (44" X 55"), you'll have 8 rows of 10 large and 9 skinny rectangles. Make 9 of the 1-1/2" rows to fill in between.
Labels:
12 X 12
Wednesday, January 11, 2012
12 X 12 Scrappy Rectangles construction
Ready to start sewing these together? (For the background on this quilt-along, click here.) There are a lot of pieces, but it's actually a relaxing kind of stitching. You know - just a lot of straight lines, all the pieces are short and match easily. We just have to get everything together and then start chain-piecing. (Since we're stash-busting, this is a great time to let our minds wander off to how we're going to re-fill our storage bins with an even better stash!)
Labels:
12 X 12,
Quilt Along
Wednesday, January 4, 2012
12 X 12 - Scrappy Rectangles Next Steps
Let's get this show on the road! For anyone just joining us, click here to get the whole scoop! As you know, in our previous post, we had you get started sorting your stash into color groups. If you're still sorting fabrics, that's fine. I'm going to go ahead and get this first project started. Anyone can join us/start at any time. Here's what we're going to make with our stash scraps:
This quilt finishes at 59-1/2" X 69-1/2". It's made up of 3 different sizes of rectangles and one small square - super easy!
Labels:
12 X 12,
Quilt Along
Sunday, January 1, 2012
12 X 12 - Getting Started
Our twelve scrappy projects for 2012 will be detailed in posts tagged "12 X 12" throughout the year. Want to know more about our Scrappy New Year Quilt-along? Click here.
Today, we are going to start collecting and prepping scraps for two projects - a scrappy pet bed and a super simple scrappy quilt.
Labels:
12 X 12,
Quilt Along
Saturday, December 31, 2011
Scrappy New Year!
I'm determined this year to make a significant dent in my fabric stash. Starting now, all new fabric I bring in will be kept separate from the old fabric. I really just want to use up my older fabrics and have a stash consisting all of fabrics from this century! My goal is to make 12 scrappy projects in 2012. I'll be blogging about each one as I go. Wanna join me? I have a rough plan in mind. There'll be a nice variety of projects. Some small, some big, some quick, and some that I'll work on over time.
Labels:
12 X 12,
Quilt Along
Subscribe to:
Posts (Atom)